In this article, you will learn how to change case in Excel in detail. You will get to know about formulas based on different functions to change case into upper, lower, and proper. You will get knowledge about using power query and DAX function.
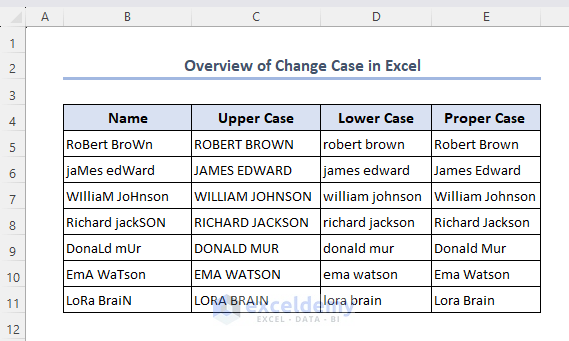
Change Case in Excel refers to the process of converting the case (uppercase, lowercase, or proper case) of text within cells. Excel provides various methods to change the case of text, allowing users to manipulate and format their data.
Download Practice Workbook
You can download this practice workbook while going through the article.
How to Change Case in Excel
1. Apply Excel Formulas
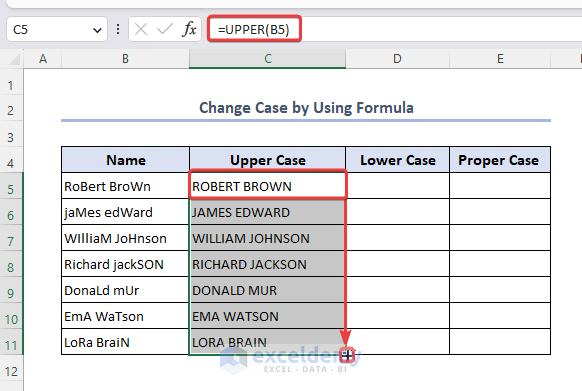
1.1 Excel UPPER Function
The UPPER function is used to convert names into upper case.
- Select cell C5 and insert the following formula.
=UPPER(B5)- Use the Fill handle to the entire column to get all the names in upper case.
1.2 Excel LOWER Function
For lowercase we can use the LOWER function.
- Select cell D5 and insert the following formula.
=LOWER(B5)- Use the Fill handle to apply for the existing cells.

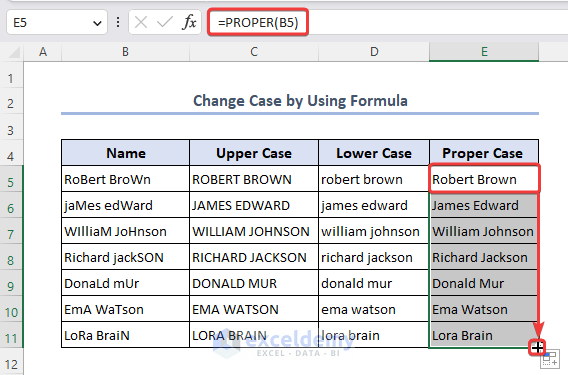
1.3 PROPER Function
The proper case is used to represent name or title. We can use the PROPER function for that.
- Select cell E5 and apply the following formula.
=PROPER(B5)- Apply the Fill handle to insert proper case in rest of the cells of the column.
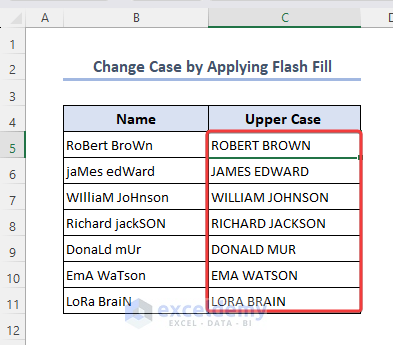
2. Apply Excel Flash Fill Feature
To apply Flash Fill option,
- Insert the content of cell B5 into cell C5 in upper case and go to the Data tab.
- Expand the Data Tools option and select Flash Fill feature.
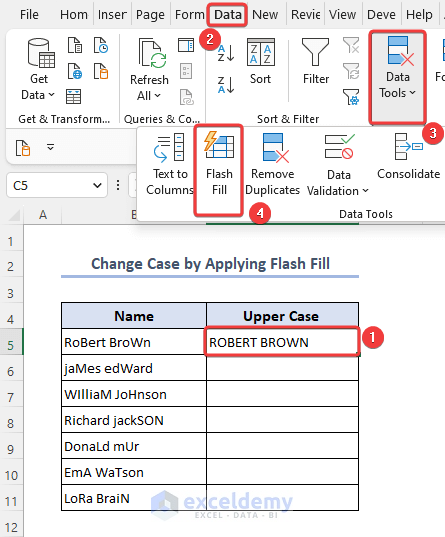
- You will find all the cells filled with upper case automatically.
- Alternatively, insert a name in lowercase in cell C5 and use the Flash Fill by clicking on the right-bottom plus (+) icon.
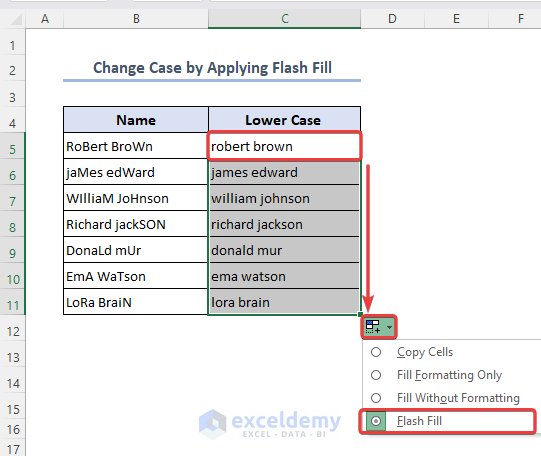
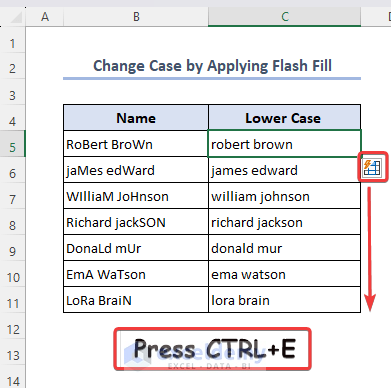
- You can also use the keyboard shortcut CTRL + E to apply flash fill for the entire column.
The Flash Fill feature is not applicable for proper case.
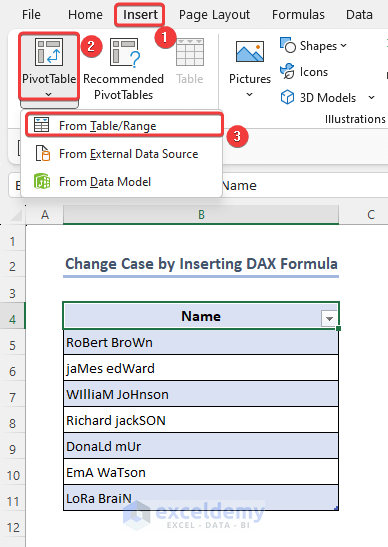
3. Insert DAX Formula in Pivot Table
For inserting DAX formula,
- Go to the Insert tab and expand the Pivot Table option.
- Select the option From Table/ Range.
- Insert a name on the Table/Range box.
- Check on the Add this data to the Data Model.
- Click on OK.
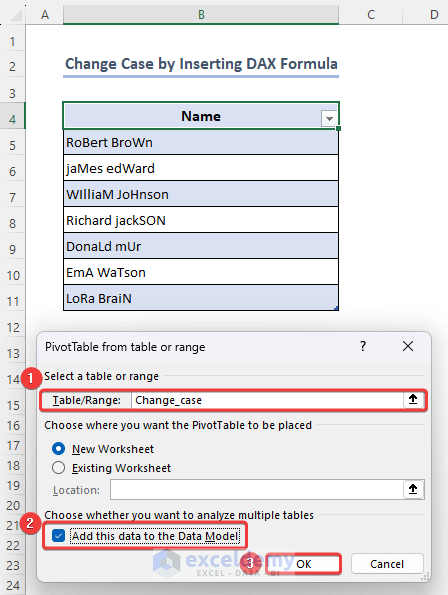
- From the Pivot Table Field, right-click on the Change_case option and select Add Measure.
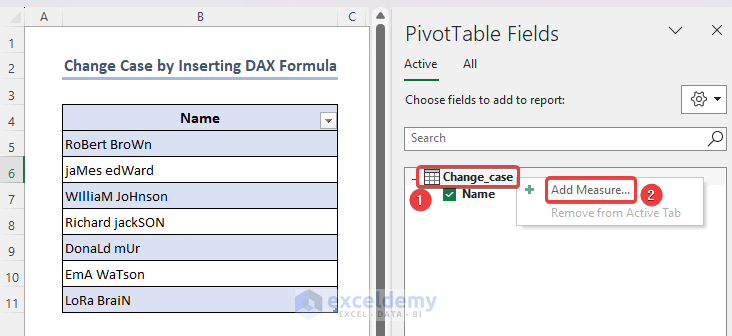
After that, the Measure window will open up. You will be able to apply DEX formula in this window.
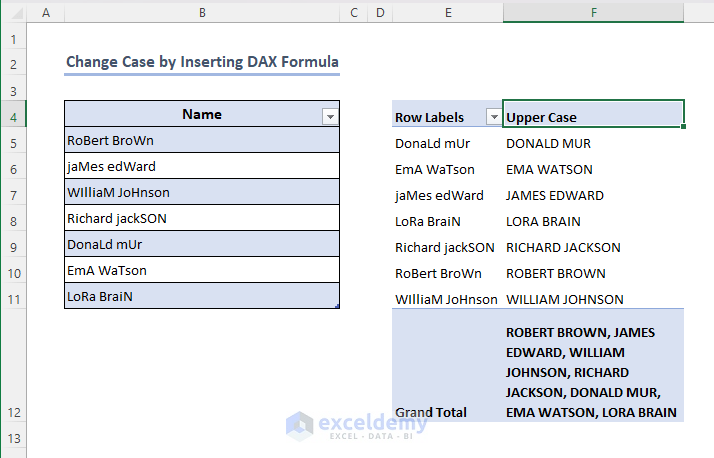
3.1 UPPER DAX Function
Now for upper case use the UPPER DEX formula,
- Insert the Upper Case as Measure Name.
- Then insert the following formula.
=CONCATENATEX(Change_case,UPPER(Change_case[Name]), ", ")- Select General option and click on OK.

- You will find the upper case of all names added automatically to the list.
3.2 LOWER DAX Function
For lowercase, use LOWER DAX formula,
- Set Lower Case as Measure Name.
- Apply the following formula.
=CONCATENATEX( Change_case, LOWER( Change_case[Name] ), ", ")- Select General and click on OK.

- You will find all lower cases names in the list.

4. Use Excel Power Query to Change Case
To apply power query,
- Select the entire dataset and go to the Data tab.
- Select the From Table/ Range option.
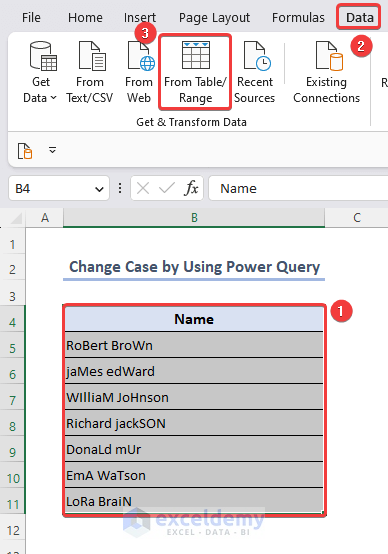
- Insert the data range and check on to the My table has headers.
- Click on OK.

After that, we enter into Power Query window.
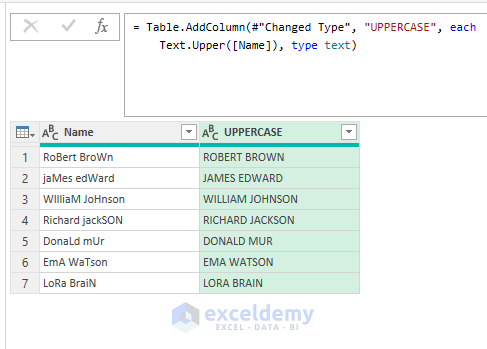
4.1 Text Upper Power Query Function
After adding the power query table,
- Go to the Add Column tab and expand the Format option.
- Select UPPERCASE from the list.

- You will find upper case of the name automatically added to the list.
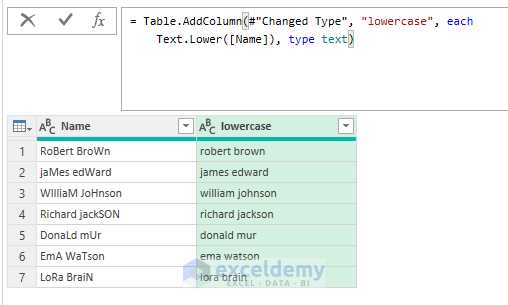
4.2 Text Lower Power Query Function
For lowercase text with power query,
- Go to Add Column and expand Format option.
- Select the lowercase option.
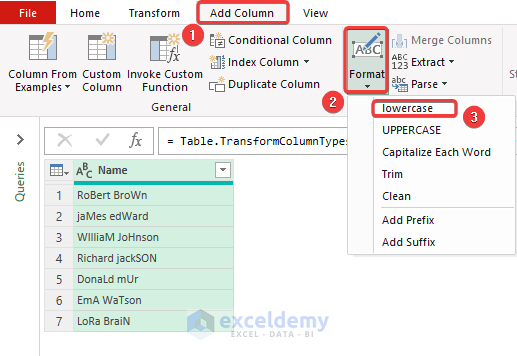
- You will find lowercase names automatically added to the list.
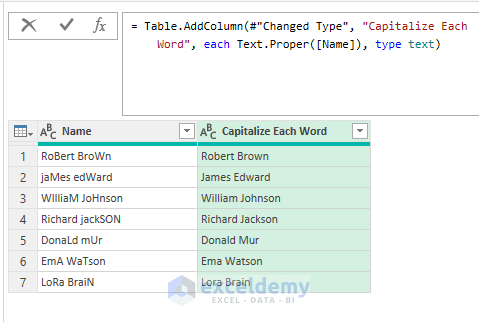
4.3 Text Proper Power Query Function
For proper case text with power query feature,
- Select Add Column and expand the Format tab.
- Select Capitalize Each Word from the list.
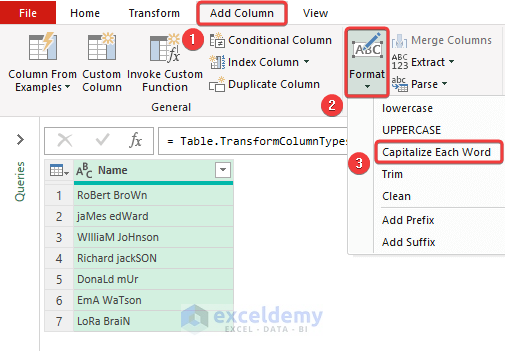
- You will find the proper case format of the names added in the list.
Read More:
- Change Lowercase to Uppercase with Formula
- Change Upper Case to Lower Case
- Change Sentence Case in Excel
- Change Lowercase to Uppercase
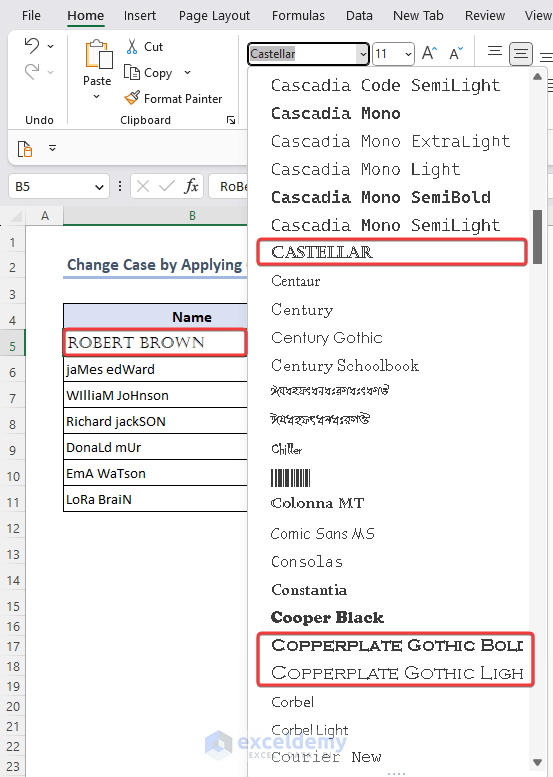
5. Change Fonts to All Caps Format
You can also get text in upper case format using all caps Font format. Some of the fonts in Microsoft Office contain only upper case letters and those are:
- Copperplate Gothic
- Engravers
- Felix Tilting
- Stencil
- Castellar
You can select any of them from the Font section and convert your data format into upper case.
Read More:
- Change to Proper Case Without Formula
- Change Lowercase to Uppercase in Excel Without Formula
- Change Case in Excel Sheet
- Change to Title Case in Excel
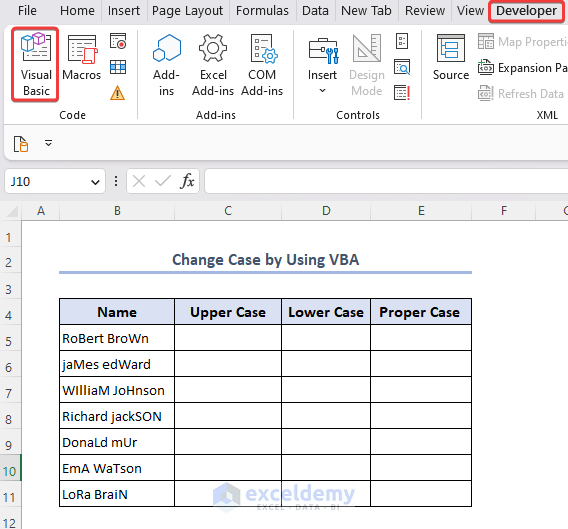
6. Converting text case with a VBA macro
- Select Visual Basic from Developer tab to enter VBA window.
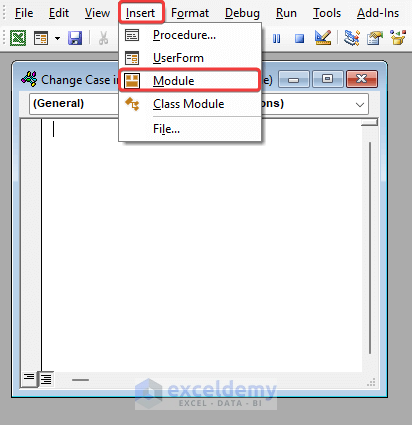
- Create a new VBA module from Module option of the Insert tab.
- Paste the following VBA code in the module.
- Run the VBA by pressing F5 button or run button marked in the image.

Sub Case_change()
    'variable declaration
    Dim selection_range As Range
    Dim cell As Range

    'insert source data
    Set selection_range = Application.InputBox("Select data range:", Type:=8)
    'loop through cells of source data
    For Each cell In selection_range
        If Not cell.HasFormula Then
        cell.Offset(0, 1).Value = UCase(cell.Value)
        cell.Offset(0, 2).Value = LCase(cell.Value)
        cell.Offset(0, 3).Value = StrConv(cell.Value, vbProperCase)
       End If
    Next cell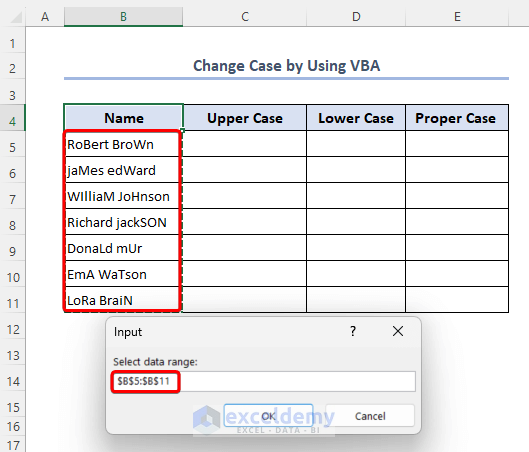
End Sub- A dialog box will appear to select a range. We selected range B5:B11.
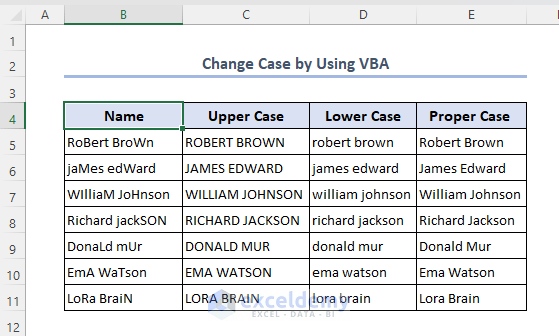
- Finally, you will get the case change result in next columns.
For Each cell In selection_range
        If Not cell.HasFormula Then
        cell.Offset(0, 1).Value = UCase(cell.Value)
        cell.Offset(0, 2).Value = LCase(cell.Value)
        cell.Offset(0, 3).Value = StrConv(cell.Value, vbProperCase)
       End If
Next cell- A for loop works based on the cells of selection_range If cells do not contain any formula then for loop will proceed.
- The uppercase, lowercase, and proper case letters will paste on the next columns one by one.
Read More:
- Change Case for Entire Column
- Make First Letter of Sentence Capital in Excel
- Capitalize First Letter of Each Word in Excel
- Change Case in Excel Without a Formula
Frequently Asked Questions
1. Can I convert the case of a specific range of cells instead of an entire column in Excel?
Yes, you can convert the case of a specific range of cells in Excel. Instead of selecting an entire column, you can select the range of cells you want to convert, and then follow any of the methods mentioned earlier to change the case. The selected range of cells will be converted to uppercase or lowercase based on your selection.
2. Is there any keyboard shortcut to quickly change the case in Excel?
No, Excel does not have any keyboard shortcuts to change the case of selected cells: You can use any of the methods mentioned in this article.
3. Will changing the case of text in Excel affect the original data?
Yes, changing the case of text in Excel will affect the original data. When you convert text to uppercase or lowercase using any of the methods mentioned earlier (such as using the ribbon buttons, formulas, or macros), Excel will modify the actual text in the selected cells or range.
It’s important to note that this modification is permanent and cannot be undone unless you have a backup of the original data or use the Undo feature immediately after making the change.
If you want to keep the original data intact and have the converted text in a separate column or range, you should consider using formulas or macros to copy the converted text to another location rather than modifying the original data directly. This way, you can preserve the original text and have the converted version in a different location within your worksheet.
Conclusion
After completing this article, we believe you will develop a clear concept about change case in Excel. You can use this knowledge in your analysis. If you want to get more details, you can go through the knowledge hub section of this article. For further query feel free to comment in the comment section.
Change Case in Excel: Knowledge Hub
- Capitalize All Letters Without Formula in Excel
- Stop Auto Capitalization
- VBA to Capitalize First Letter of Each Word
- Use VBA in Excel to Capitalize All Letters
- Automatic Uppercase in Excel VBA
<< Go Back to Text Formatting | Learn Excel

