To demonstrate the purpose and applications of the Excel Selection Pane is the aim of this content.
Often professionals require to build shapes, graphs, charts, and so on, even sometimes importing images becomes compulsory while dealing with Excel Spreadsheets. In contrast, the issue peeps when there are multiple objects. Moreover, some objects remain in the shadow of the augmented forward object. In the interim, it is inscrutable to users while finding necessary shapes or objects. Considering the shortcoming, MS Excel offers a unique Selection Pane tool to navigate all the objects in the worksheet.
Download Practice Workbook
To practice, please download the Excel Workbook file from the link below.
Introduction to Excel Selection Pane
The Excel Selection Pane is a unique, useful, and frequent tool that offers to navigate numerous objects such as shapes, images, charts, and so on in a worksheet. Changing orders, hiding, and renaming objects, can all be accomplished by the Selection Pane.
How to Display Excel Selection Pane
There are 2 ways to show the Selection Pane from the Top Ribbon. One is from the Find and Select command of the Home tab another one is from the Arrange group of the Page Layout tab. Moreover, there is a keyboard shortcut to open Selection Pane in Excel.
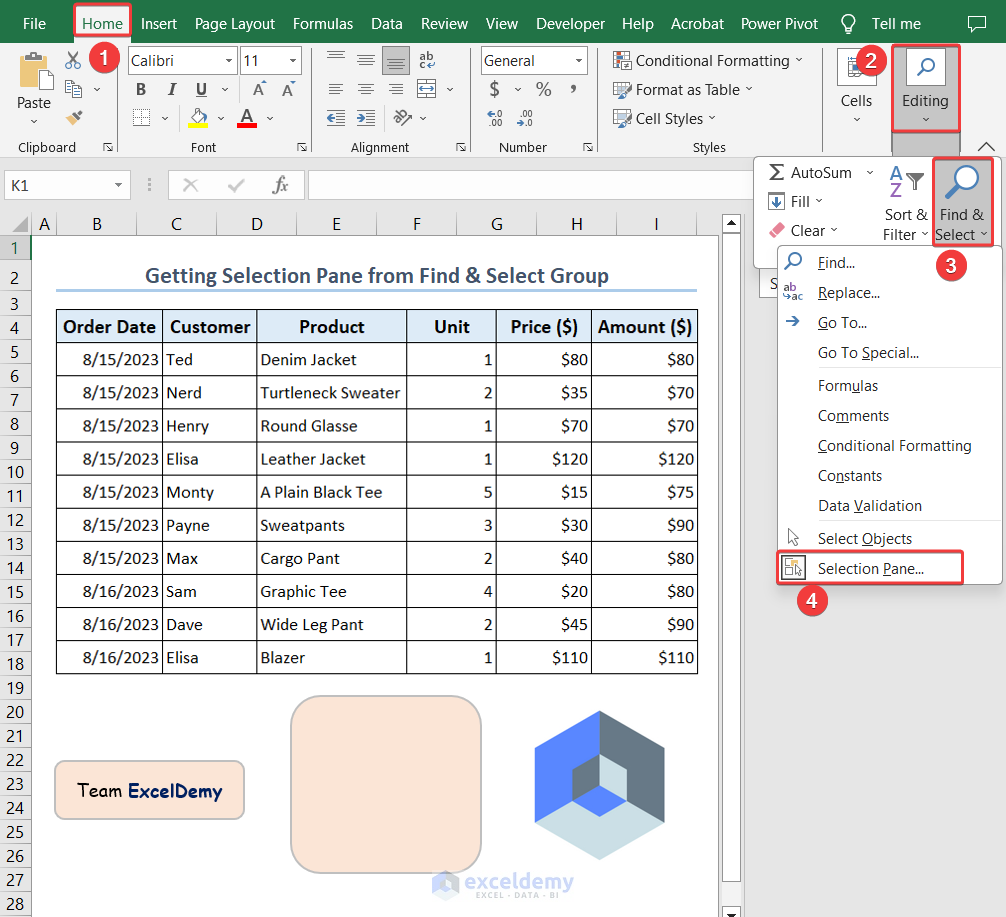
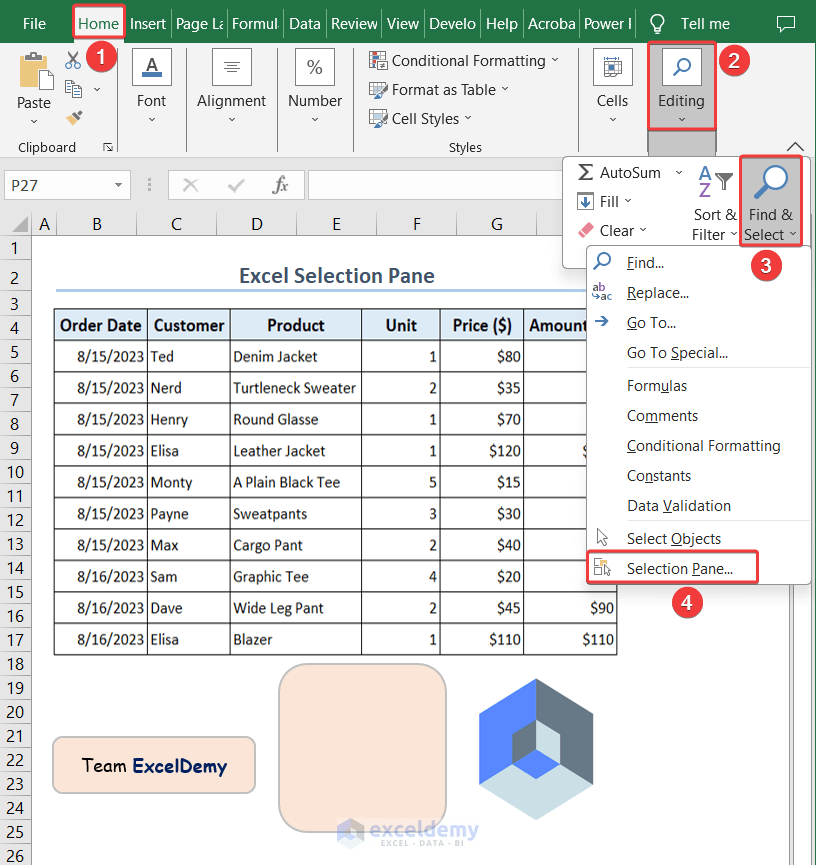
1. Using Find and Select Command of Home Tab
The most easiest and convenient way to get the Selection Pane is the use of the Find & Select command from the Home tab.
Initially, go to the Home tab >> Then, expand the Find & Select command from the Editing group >> Next, Choose Selection Pane from the list.
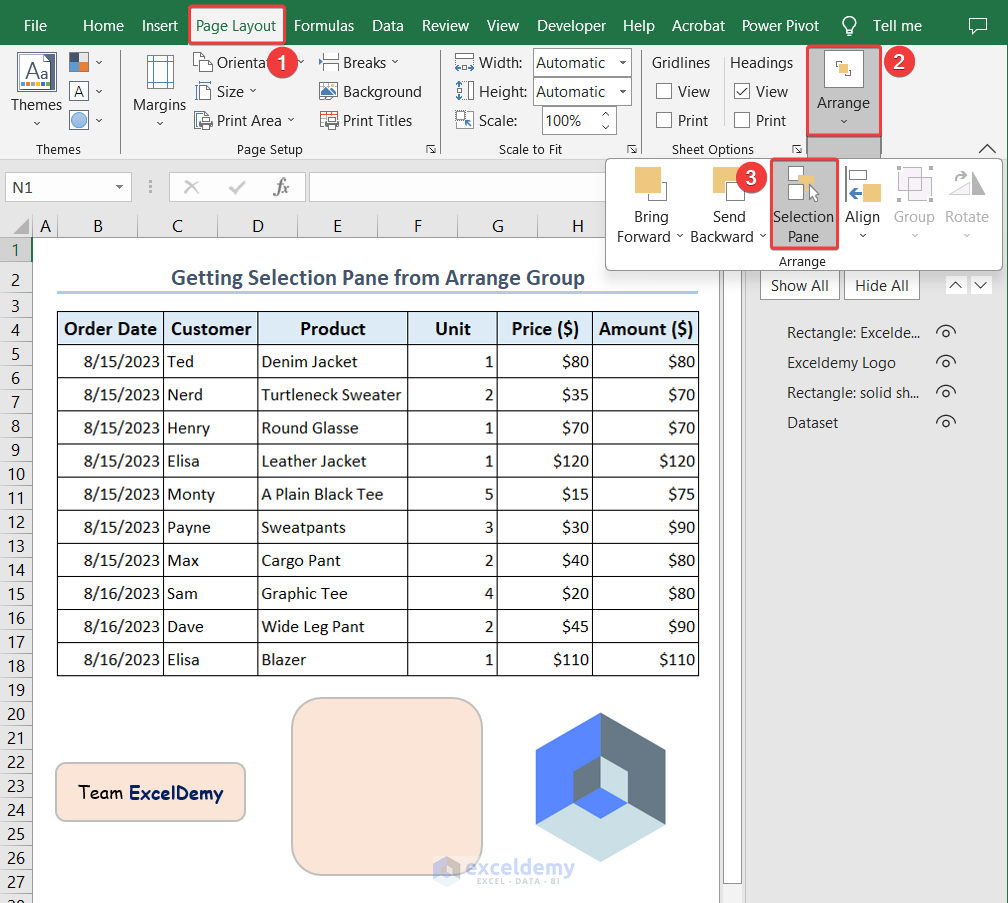
2. Using Arrange Group of Page Layout Tab
There is another alternative to select the Selection Pane from the Arrange group of the Page Layout tab.
Starting from going to the Page Layout tab >> Next, expand the Arrange group >> After that, select the Selection Pane from the list.
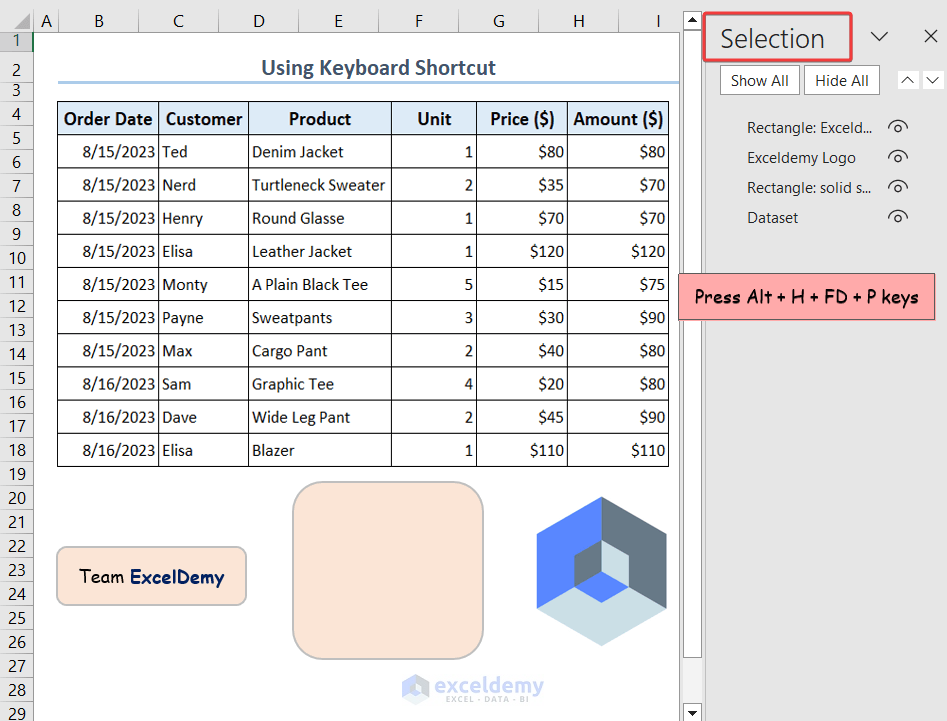
3. Apply Keyboard Shortcut to Have Selection Pane
There is a keyboard shortcut that opens the Selection Pane within a moment. By pressing the Alt + H + FD + P keys sequentially, users can open the Selection Pane.
How to Use Excel Selection Pane: 3 Useful Applications
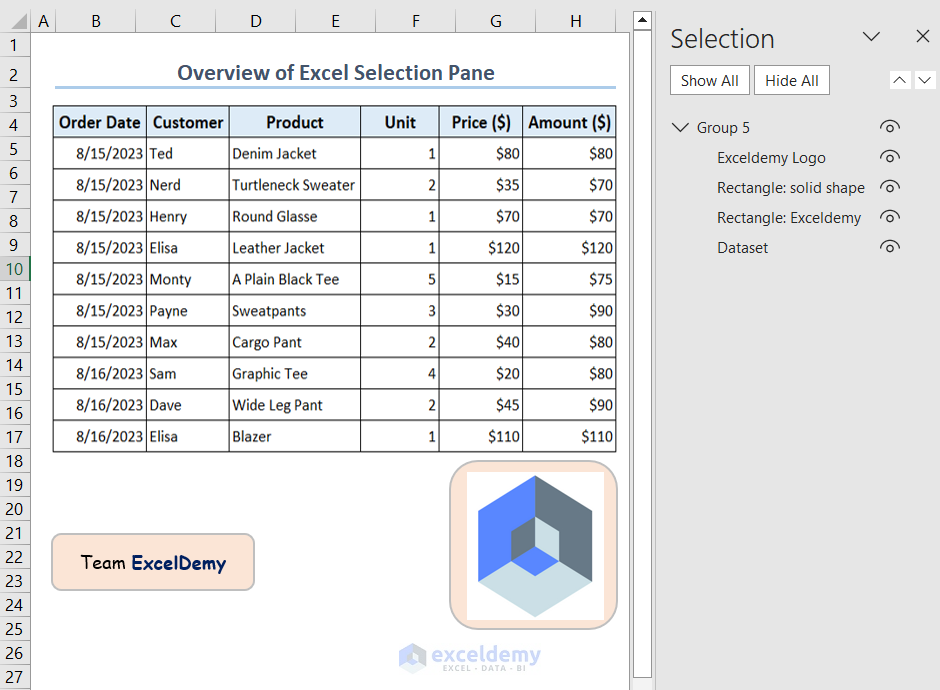
Considering the presence of a dataset image, an ExcelDemy logo, and two Rectangular solid shapes in a worksheet to show every possible application such as object renaming, changing orders and hiding, etc. using the Selection Pane.
However, to do so, you must get the Selection Pane first. So, go to the Home tab >> Next, expand the Find & Select command from the Editing group >> Further, choose the Selection Pane from the list.
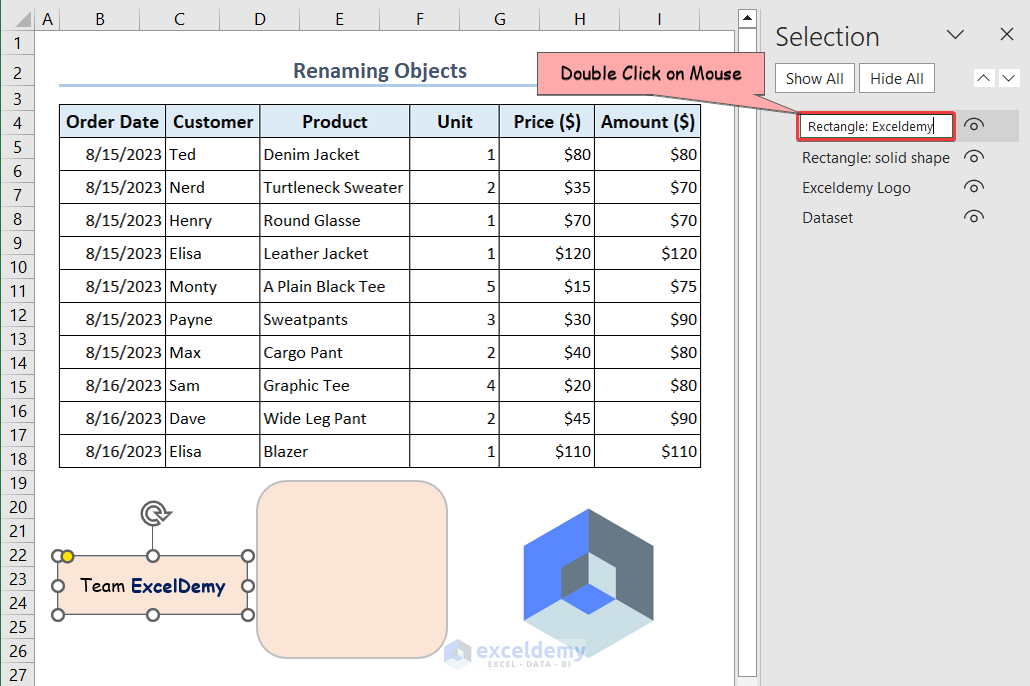
1. Rename Objects
To get our job easier the distinct name of the separate objects is irreplaceable.
- To rename objects, Select the object from the Selection pane >> Then, Double-Click on the Mouse >> Next, rename as Rectangle: Exceldemy.
- Consequently following similar approaches we rename all the objects from the Selection Pane.
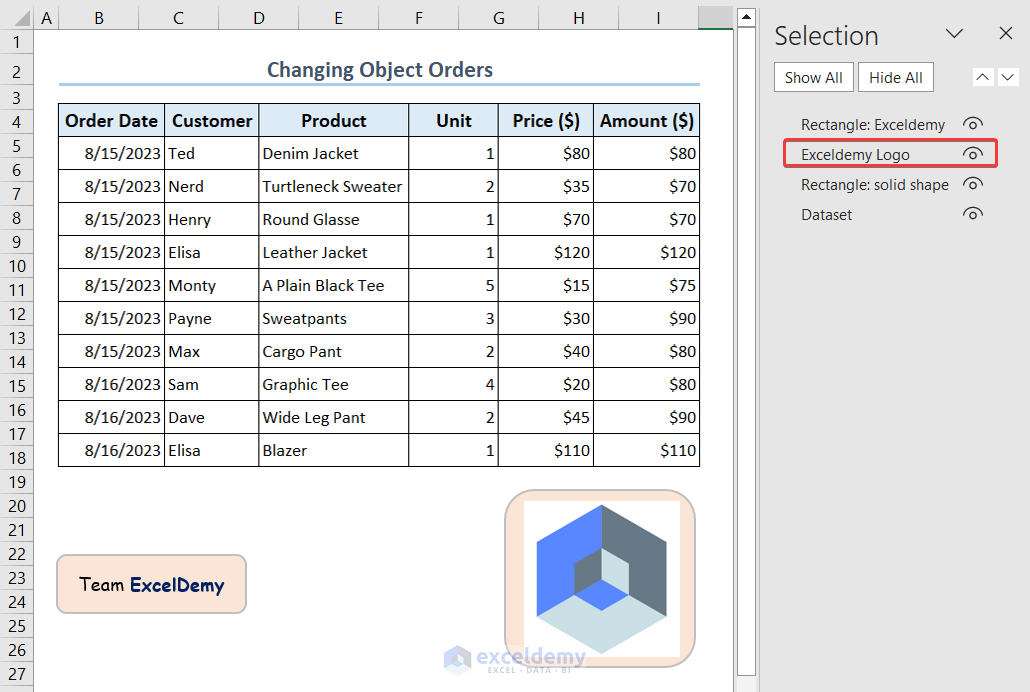
2. Change Object Order
Often we require to bring one or multiple objects forward, even sometimes backward. It’s required since we intend to add an additional shape on the back of a logo or image. As you can see in the below image, the shape named Exceldemy logo hides in the back of Rectangle:solid shape object. If you look closely in the Selection Pane, we obtain the object order in descending order (Newest to Oldest).
- To bring the object forward, select the Exceldemy Logo object from the Selection Pane >> After that click on the Bring Forward command.
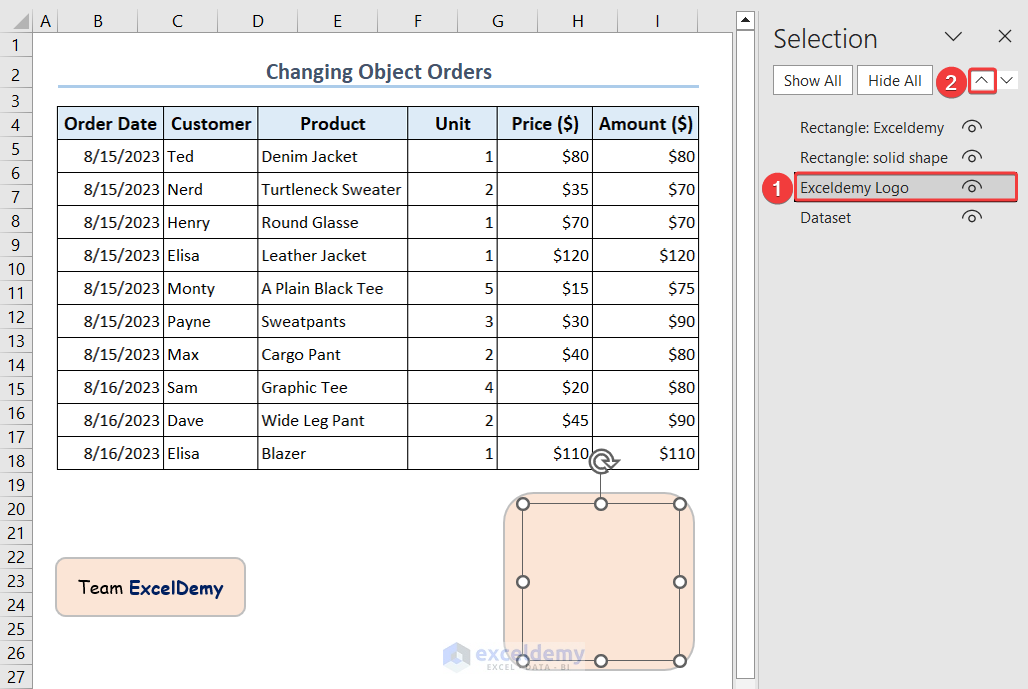
- Therefore, we change the order of the object list and the Exceldemy Logo object comes forward.
3. Group Objects
Dealing with multiple objects is a tad tedious. Grouping the objects and converting them into one, can be a solution to moving or having them altogether.
- To group multiple objects, hold the Ctrl key, and select all 4 objects >> Next, Right-Click on the Mouse to get the Context menu list >> After that select the Group command from the Context menu list.
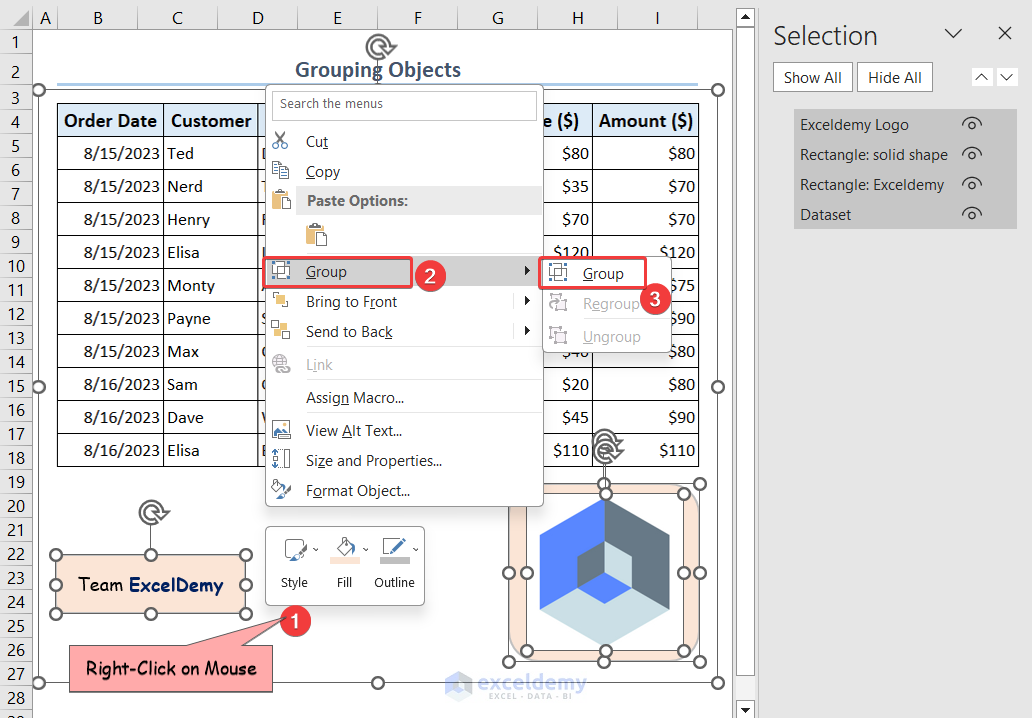
- Consequently, all the objects in the worksheet are converted into single-grouped objects.

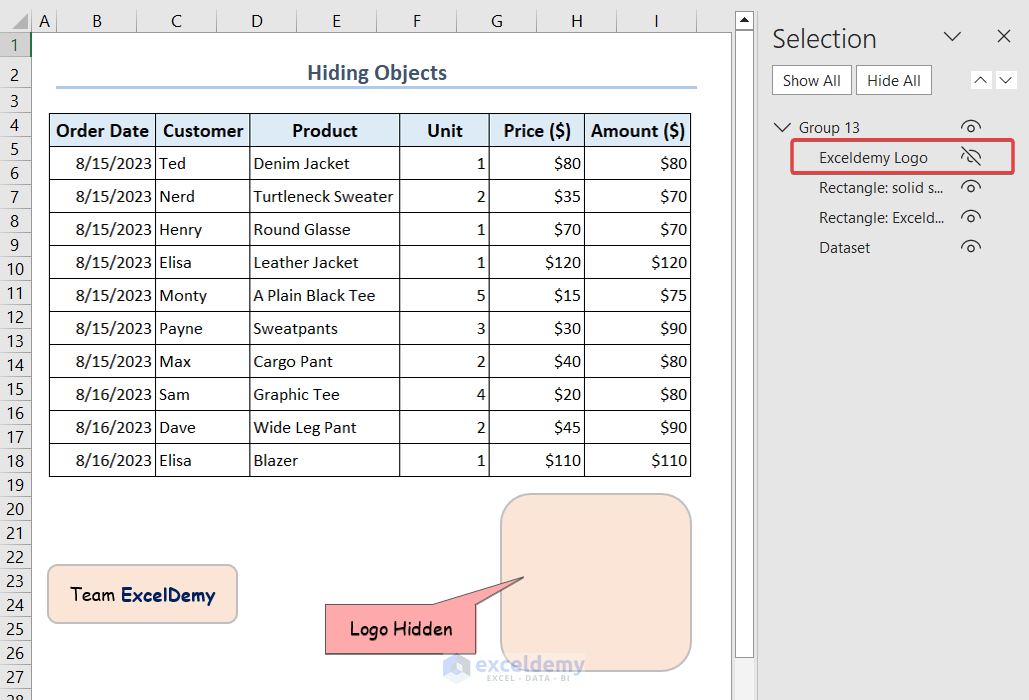
4. Hide objects
In some cases, we require to hide some objects from the worksheet while performing corrections, transformation, and so on. Likewise, we intend to hide Exceldemy Logo from the worksheet. To do so, click on the Eye icon beside the Exceldemy Logo from the Selection Pane.
Frequently Asked Questions
1. What is Keyboard Shortcut to get Excel Selection Pane?
By pressing Alt + H + FD + P keys sequentially, users can obtain Excel selection Pane.
2. Can Excel Selection Pane show all hidden objects?
Yes, click on the Show All command from the Selection Pane to unhide all the objects.
3. Can I resize image from the Excel Selection Pane?
Apparently, no. However, selecting images Picture Format tab appears in the Top Ribbon that allows image formatting in Excel.
Conclusion
In short, We construe in and out on the Excel Selection Pane. Additionally, we delineated 3 approaches to get Selection Pane along with its 4 applications. I hope now you comprehend the uses of Selection Pane. Any queries, as well as suggestions, are appreciated. However, don’t forget to leave your insights regarding the tutorial. Hope to catch you soon on any fresh content.
<< Go Back to Excel Parts | Learn Excel

